Tuesday, May 26, 2009

Tutorial Reviews for Week 10

1) “Illustrator’s Type Tool: A Comprehensive Introduction” Tutorial

http://vector.tutsplus.com/tutorials/tools-tips/illustrators-type-tool-a-comprehensive-introduction/

This tutorial covers all the basic functions of the type tool in Illustrator. The Area Type Tool, Path Tool, and Vertical Type Tool’s are revealed through a quick explanation and an example image. There is also a guide for the keyboard shortcuts and cursors to help you recognize the tools. It also explains how to the different type panels; character, paragraph, open type, glyph, character styles, paragraph styles, and tabs. Wow! This tutorial really fills you in!

Some of the functions:

...so that's what all the type cursors do and mean....
Read this tutorial and become knowledgeable!

2) “Texture: Adding Texture to your Vectors” Tutorial

http://www.istockphoto.com/article_view.php?ID=215

This tutorial teaches you how to apply texture to your Illustrator creations that were not computer generated. You will learn how to make a hand-made texture effect using China graph pencil on watercolor paper to create your image and the shading into a vector image. This tutorial was interesting and I loved the image they used as an example, it was a hippo!

3) “Communicating with Typography” Tutorial

http://vector.tutsplus.com/tutorials/designing/communicating-with-typography/

This tutorial explains characteristics that can influence how the type is interpreted and communicates. The author defines the type characteristics; typeface & font, size, kerning, leading, capitalization, and color. There are numerous varieties of each characteristic and need to be taken under deep consideration when designing a document using font. This tutorial was very informative…I hope this information can prep me for my typography class in the fall.

4) “Dramatic Text on Fire Effect in Photoshop” Tutorial

http://psd.tutsplus.com/text-effects-tutorials/dramatic-text-on-fire-effect-in-photoshop/

I chose this tutorial because last week everyone seemed to put their image for their books on fire and I wanted to know how they did that. This tutorial shows you how to apply fire to text by using a photograph of fire because the author said it’s difficult to create fire in Photoshop. This tutorial applies a textured background, layer setting, filters, layer masks, smudge tool, and a fire image in 33 steps to create amazing looking text. I think this tutorial to be very cool!

5) “Retro Text Photoshop” Tutorial

http://photoshoptutorials.ws/photoshop-tutorials/text-effects/retro-text.html

This tutorial combines Photoshop and Illustrator to create and edit their “retro text”. This tutorial showed you how to create “retro text” in 25 steps that have a picture example and explanation. This tutorial combined the Art Brush, Pen, Guides & Grid, Selection, Lasso, Layer adjustments, and Video Layer tools to make their creation. There was definitely a lot going on in this tutorial.

Saturday, May 23, 2009

Image Book Process

I am having so much fun creating my images for my barn image book.  I have so many ideas..My mom and I visited the barn over the weekend and collected supplies to make some handmade images. (my mom and I are both really excited about this project).  We collected nails, shingles, and weeds from inside and around the barn.  I knew that I wanted to use my family's branding iron to create a pattern for the barn in one of my images. ...so I made a plan to go to my grandpa's shop to use his branding iron...
My grandpa has both an electric branding iron (you plug it in to heat it up) and a manual brand (you set the iron in a fire or apply heat, like above picture, to heat up the iron).  I used both irons to brand the shingles.

This was so much fun!.... and it was nice to get some of the family together for an art project! :)

Thursday, May 21, 2009

Tutorial Reviews for Week 9

More ideas from tutorials on what to do to my barn for my image book….

1) “Nature Blur Effect” Tutorial

http://www.photoshopstar.com/effects/nature-blur-effect/

In this tutorial you learn how to apply a clear word over a blurred image.  This tutorial uses adjustments, filters, and the selection tool to combine beautiful elements to create an awesome finished product.  This tutorial interested me because I think it is an interesting concept that I have never thought about before…I’m always learning something new and getting new ideas.

This tutorial was very helpful:


This tutorial added a decorative aspect to it that is fun and beautiful:
I used this tutorial to create an image for my image book:

I love it!...

2) “Photo Manipulation” Tutorial

http://www.photoshopstar.com/photo-effects/photo-manipulation/

In this tutorial you learn how to apply a texture layer to an image.  In this tutorial the image is an eye and the texture layer is the world, which is very cool looking.  This tutorial uses a combination of image adjustments, modes, dodge tool and sharpen tool to apply its effect.  


3) “Make the Striking Grass” Tutorial

http://www.photoshopstar.com/effects/make-the-striking-grass/

I chose this tutorial because I was thinking of making one of my barn images full of grass to show nature taking over the very old barn.  In this tutorial you learn how to make a nature composition using Photoshop tools.  The tutorial uses the eraser and brush tools to apply texture to the elements of the image.


4) “Pearl Necklace” Tutorial

http://www.photoshopstar.com/graphics/pearl-necklace/

In this tutorial you learn how to make a pearl; it really is possible! This tutorial applies layer styles, the eraser tool, and filters to a shape created by the Elliptical Marquee Tool to create an image that looks like a pearl.  This tutorial is so cool, maybe I will make the barn classy and dress it up in pearls.


5) “How to make Patch on Clothes” Tutorial

http://www.photoshopstar.com/graphics/how-to-make-patch-on-clothes/

In this tutorial you will learn how to make an image that looks like fabric that has been sewed together in Photoshop.  This tutorial uses filters, layer modes, layer styles, warped text, and the brush tool to create a sewn fabric illusion.  I think this tutorial is really cool because the image looks like it is a photo of fabric.

Sunday, May 17, 2009

Tutorial Reviews for Week 8

I chose these tutorials with the Picture Book Assignment in mind…What I learn from these tutorials can possibly be an adjustment I make to my picture for my book…we will see….I do like these effects!

1) “Halftone Dots and Linear Light Tutorial” http://www.theshockzone.com/tutorials/halftonedots.php This tutorial was fun, fast, and easy. In this tutorial you learn how to transform your image into dots. By using a simple filter and adjusting size and contrast of the sketch halftone pattern, you can create a fun image.


Here is my before and after:
I spent most of my time adjusting and readjusting the size and contrast of the dots to see what outcome I liked the best.

2) “Fill a Photo with Photos” Tutorial
http://www.photoshopessentials.com/photo-effects/photo-fill/
This tutorial takes the last tutorial a bit further. In this tutorial you learn how to create a photo made up of many little photos. This tutorial has a nice flow that takes you through the steps of cropping and sizing the photos, positioning photos, Desaturating photos, making a pattern with the photos, and blending the photo layers. I could not believe how easy it is to make a photo out of photos…I used to wonder how it was done...and now I know!

3) “Easy Watercolor Painting Effect” Tutorial
http://www.photoshopessentials.com/photo-effects/watercolor-painting/
This tutorial teaches you how to apply different filters and blend layers to create a cool effect to your image. I thought it was interesting how this tutorial used the “cutout” filter to simplify their image. The precise combination of layer filters and blend options makes an awesome final product. I really like this water color effect; I think it looks great when vibrant colors are in the image.

4) “Create Sepia Toned Images!” Tutorial
http://www.tutvid.com/tutorials/photoshop/tutorials/sepiaToning.php
This tutorial begins with the narrator finding an image and then adjusting the images angles. It was interesting how he rotated the canvas to the angle he wanted by clicking Arbitrary. Next he shows you two ways to apply the sepia tone effect. First he used the Channel Mixer to turn the image from color to black and white used a mode to set it to grayscale. Then he uses Duotone options to apply a sepia color. Second he used a solid color adjustment layer. Lastly, he shows you how to add noise to give the image an aged look.

5) “Learn to Use the Curves Image Adjustment!” Tutorial
http://www.tutvid.com/tutorials/photoshop/tutorials/curvesAdjustment.php
I selected this tutorial because I wanted a better understanding of how Curves works and what the features in the Curves dialogue box represent. This tutorial explains the Curves dialogue box as well as uses it in Photoshop to illustrate the effect it has on an image. Curves make brightness, contrast, and color corrections in an image. The narrator is a good teacher, I enjoyed watching and listening to him explain the Curves tool.

Picture Ideas for my Photo Book...

I know that I want the image I choose to have sentimental value.  I also wanted to choose an image that my family would like so when the photo book is finished we all can all love it :)

There are two figures that I would want to use for my image book....Those figures are of Mt. Hood and the Home Place Barn.  I have a few images of each of these figures that could each make an awesome book.  

Why a mountain? why an old barn?
Well.... my mom's side of the family are farmers in Dufur, Oregon...so she has a strong connection to our land and its surroundings...which means these images are of sentimental value.  

We can see an amazing Mt. Hood view from our house and I want to take that view and turn it into a book.  
Here is one image of Mt. Hood that I have that was taken at sunset...if I were to use this image I would need to brighten it up a bit.
The Home Place Barn was built by my Great-Great-Grandfather, Arthur James Underhill, on the farm he purchased next to his mother’s farm.  The barn was built in the late 1800’s with lumber from his own sawmill.  The frame of the barn is built in the peg and post style like all the barns of its day.  This means that the beams were attached to each other by drilling holes and using pegs of wood to keep them together.  The barn was used for the horses that were needed to operate the machinery on the farm.  My Great-Great-Grandfather and his family lived on this farm. My Great-Grandfather and his family lived on this farm and even my Grandparents lived on the farm for several years. So I would like to take an image of this barn and turn it into a book so we can have the memory of this barn live on in a book.  Here are a couple of images of what the barn looks like today:


Thursday, May 14, 2009

Tutorial Reviews for Week 7

1) “Soft Focus Wedding Photograph Effect!” Tutorial
http://www.tutvid.com/tutorials/photoshop/tutorials/softFocusWeddingEffect.php
This tutorial was fast and simple. The narrator got to his finished product by using a couple tools and simple steps. He was using some tools that I have never used before and used a tool I have not heard of. I did not know about the feather selection tool until this tutorial. Some of the tools he used to create his image were filter blur, radial blur, fill layer, and adjustments layers.

First, he selects where he wants focus to remain and applies a blur to everything else.
Next he chooses the fill layer color.
Lastly, after color adjustments and applying more blurs he has a beautiful intimate picture.
The picture I selected to use for this tutorial isn't romantic like the picture he used...but I do think this picture is kind of funny because of the country puppets we are sitting with....
Our (josh and my) faces are in focus...pretty neat...I think this picture kind of has a westerny feel now...:)

2) “How to Turn Humdrum Photos into Cinematic Portraits” Tutorial
http://psd.tutsplus.com/tutorials/photo-effects-tutorials/how-to-turn-humdrum-photos-into-cinematic-portraits/
This tutorial shows you how to turn a regular photo into a dramatic “cinematic portrait”. This tutorial supplies the links to where you can get the images he used to create his final portrait so you can follow along using the same images if you want to. This tutorial is interesting because it has the steps listed in text as well as a video. I personally thought the narrator to the video tutorial version was a little funny and could possibly have an English accent.

3) “Enhance Your Image with Selective Color Adjustment” Tutorial
http://psd.tutsplus.com/tutorials/photo-effects-tutorials/enhance-your-image-with-selective-color-adjustments/
In this tutorial you learn how to separate a foreground object from the background onto different layers so it is easier to adjust them. This tutorial uses an extract filter, masks, selective color adjustment layers, and the gradient tool to turn a washed out beach photo into a vibrant beach photo. This tutorial is thirteen steps but the content in each step includes quite a bit of information and tasks.


4) “Souping up a Photo” Tutorial
http://psd.tutsplus.com/tutorials/photo-effects-tutorials/souping-up-a-photo/
This tutorial changes the color palette and creates a greater contrast to give a photo more “punch”. I found steps three and four to be very interesting because they applied a technique I was unaware of using. In steps three and four, the duplicated image layer was set to black and white and then applied as a transparent overlay to the original image to sharpen the image. The tutorial also shows you how to get rid of unwanted noise, de-saturate the image, and apply color and texture by using another image.

5) “How to Use Depth of Field to Create Portraits with Blown-Out Backgrounds” Tutorial
http://psd.tutsplus.com/tutorials/photo-effects-tutorials/how-to-use-depth-of-field-to-create-portraits-with-blown-out-backgrounds/
This tutorial is very interesting because the fist six steps of the eleven step tutorial is about photography. The author of this tutorial explains what aperture is and how to adjust the camera to take a portrait. She also shares some photo taking tips like distance between your subject and the background and how people in your portrait should be at the same distance from your camera. In steps seven through eleven she teaches you how to enhance a background blur in Photoshop.

Wednesday, May 13, 2009

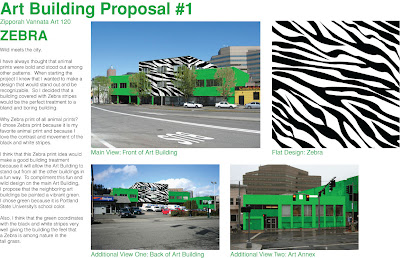
Art Buildings Redesign Assignment....finished!

I have created my proposals for the Art Buildings Redesign assignment!


I have all three designs on the buildings in Photoshop and 3 awesome proposals. I incorporated 3 building shots, the flat design, and a description on my process and ideas on the proposals. My description on each proposal explains my thoughts, ideas, and conclusions on why my idea would be great on the Art Buildings….sounds interesting huh?!...yea!? Then check out my proposals!


(note: sorry that the sizes are different...I do not know why proposal 3 is smaller...I love it just as much as the other 2....just so you know)

This assignment all happened so fast…it was crazy! It is however very rewarding to see my finished projects and to hear compliments on my design ideas on our Art 120 Flickr group. It feels good to know that others think your creation is “Cool”! :)

Monday, May 11, 2009

Art Buildings Redesign Assignment/Progress


Okay...so i have finally created all 3 of my flat designs and have their complimentary colors picked out...whoa!

Woo-woo! zebra print! I had to do a funky design... how crazy would it be if the art building was zebra strips!?... pretty WILD!
I could have chosen any colors to be the complimentary colors but i chose green because it is our school color and it is a positive and relaxing color! ;) 
Intricate pattern...i call it leafy swirl because the pattern is made of leaves and swirls...go figure ;)!!!
I think this pattern is calming and interesting.
This design was inspired by the colors in my room...i like the colors brown, green, and pink together...:) 
I call this Nature Design because i thin it is nature like...this is a fun colorful design that kind of reminds me of spumoni ice cream...yum!


Sunday, May 10, 2009

Art Buildings Redesign Assignment/Progress

This is the beginning of the Art Building Redesign assignment. The following are sketches I have made to illustrate different visions I have for the Art Buildings new look.

This picture are doodles of design and pattern ideas I have.
The next step was to develop my ideas on the computer. The following are flat designs of the patterns I made in Photoshop and Illustrator.
The two below are the same pattern in different colors and sizes.

I will make another post when I have an update!

Tutorial Reviews for Week 6

1) “Art Building Tutorial” written by Kate Bingaman and demonstrated by Jimmy
In class on May 5th, Jimmy conducted a demonstration on how to produce our next assignment. The tutorial was very interesting and taught our Art 120 class how to put our designs on the Art building in Photoshop. This tutorial is really important to our class and is really helpful and explains all the steps. I will be definitely referring to this tutorial all week while working on our Art building assignment! (The link for this tutorial was sent as an attachment in an e-mail message so I was unsure how to post the link)


2) “Deleting Whites in Photoshop” by Ward Jenkins
http://www.ustream.tv/channel/the-ward-o-matic
I just want to start out by saying Ward Jenkins is AMAZING! Our class had the pleasure of Ward Jenkins visiting our class, share his life and projects, and perform a tutorial on how to delete white space from a scanned image and to add color to that image. This tutorial is very interesting and was fun to watch live. Ward Jenkins personality and humor comes out in the tutorial which allows the tutorial to be watcher friendly and interesting to watch.

3) “Animating a Wipe/Fade Photo Transition in Photoshop CS3!” Tutorial
http://www.tutvid.com/tutorials/photoshop/tutorials/wipeTransition.php
In this tutorial you will learn how to use the timeline animation tool. This tutorial is really cool and informative. I had no idea you could animate in Photoshop, I cannot believe no one told me about this. The man narrating this tutorial used the timeline animation tool, two pictures, and a mask to make a photo transition…neat!

4) “Creating a Gallery Style Photo with Frame and Vignette with Actions!” Tutorial
http://www.tutvid.com/tutorials/photoshop/tutorials/createGalleryStylewActions.php
The tutorial narrator shows you how to create a frame and caption box to a photograph in two ways. He quickly creates this effect by just using the action called framer as well as doing all the steps from scratch. He incorporates many tools like the sharpen tool, adjusting canvas size, and the text tool when he created the effect from scratch. (Note: The narrator is a funny guyJ)

5) “Full Fantasy Painting Tutorial! Start to Finish!”
http://www.tutvid.com/tutorials/photoshop/tutorials/fantasyPainting.php
The narrator of this tutorial used many tools to create a “fantasy” image. What made this tutorial interesting and personalized was that he created his own tools to make the image. Some of the tools he created were his own color gradient and cloud brush. (Note: This tutorial is much longer than other tutorials I have read and watched.)